The Braided Rose Hairstyle Is 2020’s Current Hair Craze And It’s Remarkably Easy To Do
Jun 05, 2020 by apost team
What says summer better than a braided rose updo hairstyle? Wear the look half up, half down, or you can bring all your hair up to the party. While it looks like it takes hours at a professional salon to achieve, it's actually simple and quick. No wonder it's taking Instagram by storm.
Meet The Braided Rose Hairstyle
This year has already seen some wildly beautiful hairstyles. Check out all the holographic hair and beautiful purple haze hair. However, to say that such looks are work would be a serious understatement. Even when inspired by nature, coloring is tremendous upkeep.
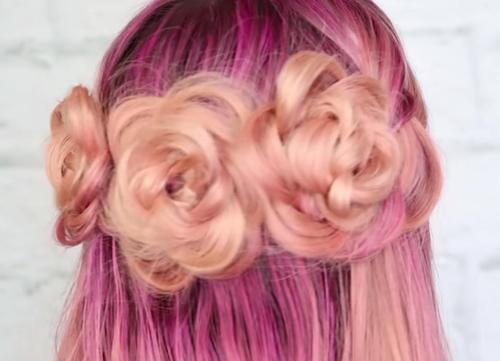
The braided rose is one of Instagram’s top trending hairstyles for 2020 for a very good reason. It looks elegant whilst still playful and fun. It looks retro and modern at the same time. This amazing braided rose style works for any hair type, face shape, and occasion. Plus, you can learn how to do it easily.
apost.com
Of course, who says you can’t have your cake and eat it, too? Not Instagram. While natural hair color braided roses look amazing, you can combine coloring and styling trends for a more dramatic look.
Check out this look by Rae Stanton - Tampa Hair that uses the braided rose on #rainbowhair. How about this braided rose with blue and purple streaks? Stunning, right? So, how do you get this awesome braided rose in your own hair. Coloring decisions aside, let’s walk you through the steps of a three rosette braided rose. You won’t believe how easy this look is to achieve.
Step-By-Step Guide To Getting A Braided Rose Look
This look has three roses, but you can do a thicker initial section and skip the other two braids for a single rose. You get all three roses in just seven steps. Here’s what you need to do:
- Step 1: Create three hair sections in the area you want the braided rose.
- Step 2: Use the three strains to plait a basic braid and secure the end with a clear thin elastic.
- Step 3: Repeat steps one and two for two additional sections, which will yield three braids in total.
- Step 4: Your braid will be tight. Use your fingers to gently loosen each section to create what will be the rose petals.
- Step 5: Generously set the braid with your hairspray of choice. Allow a moment for it to dry before moving on to the next step.
- Step 6: It’s time to create the rosette by wrapping each braid inward like you’re creating a loose bun. Secure with pins.
- Step 7: Repeat step six for the other two braids. You’ll have to judge your spacing based on the thickness of your hair, but each rose should touch at the edges.
Once you’re all done with your braided roses, you can leave the down-do straight or hit it with some flat iron waves. Of course, you can dress up your rose braids with some colored beads or even washout coloring beforehand if you’re doing it on natural hair. This look is so easy to make your own.
Need more visual help with your braided rose look? This YouTube video gives you a step-by-step guide for the braided rose. Happy braiding!
How excited are you to get this look? Will you do color, too, or leave your hair natural? We can’t wait to hear your thoughts and success stories in the comments section. Pass this look along to all your friends for their own enjoyment.